Apache as the Frontend of Tomcat
Tomcat is a reliable and rapid server which is able to operate with a large amount of data. That is the reason it can compete in performance with native web servers. Placing a secure, fast and flexible HTTP Apache server in front of Tomcat provides you with some additional functionality, e.g. high availability through performing the load balancing among multiple Tomcat servers, fast processing and delivering of static content, additional security issues available with Apache, extra functions via Apache modules and so on.
In such a way putting Tomcat behind the Apache is widely used in order to improve the high-load environments' performance.
In this tutorial we will examine how to interconnect Apache and Tomcat servers using mod_proxy or mod_rewrite modules. With such configurations Apache will pass on requests to your Tomcat application server and relay the responses back to the client.
Follow the next instruction to find out three the most popular cases of using such settings.
Rewriting Links
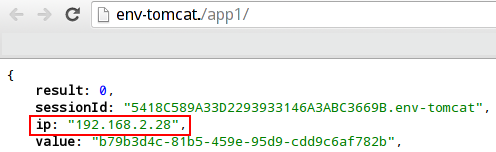
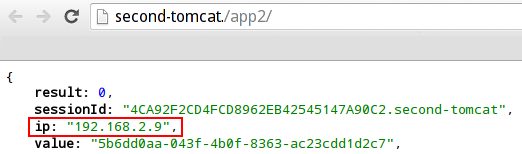
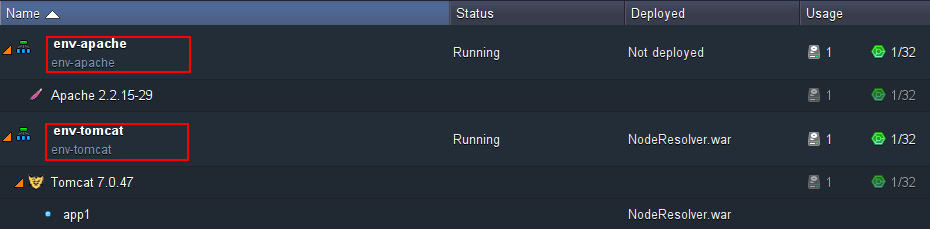
Let’s consider a situation you have at least two Java application hosted on separate app servers and different ports. As a simple example we will use two applications showing the servers' IP addresses.
- https://env-tomcat.inetsolutions.cloud/app1/
- https://second-tomcat.inetsolutions.cloud/app2/
With Apache mod_rewrite module you can make both of your apps be available on one port using the different paths. E.g.:
http://env-apache.inetsolutions.cloud/application1/
http://env-apache.inetsolutions.cloud/application2/
This configuration will provide you with an ability to manage, restart and debug each of your application separately, but at the same time the end-user will see them as a single application. Let’s find out how to set this with PaaS hosting:
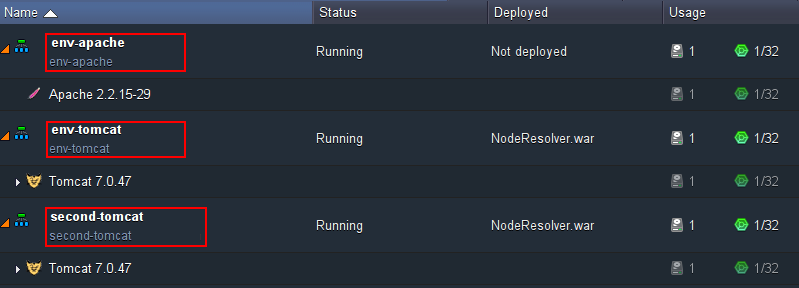
1. At the very beginning, you should have at least three environments created: one frontend Apache environment and two or more backend Tomcat environments with your Java applications hosted.
2. Open the Apache configuration manager (click Config next to it). In the appeared tab open the /etc/httpd/conf/httpd.conf file and specify the following configuration for < VirtualHost > file section.
| |
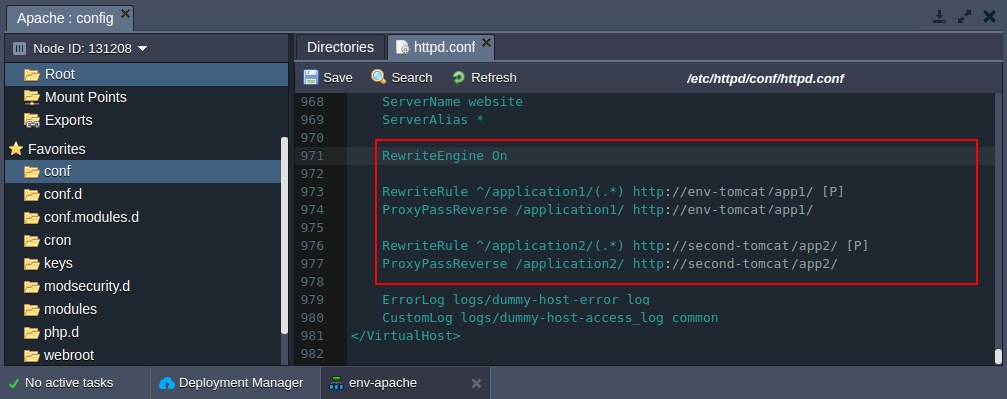
- RewriteEngine On is used for enabling the rewriting ability
- RewriteRule and ProxyPassReverse state the conditions and the result of rewriting for both applications
- RewriteLog is optionally added to store the logs of rewriting in the specified location
Don’t forget to Save the changes made and Restart your Apache server:
3. In order to check the results, press Open in Browser button next to your Apache frontend environment and add the path you’ve specified in the RewriteRule lines to the end of URL. It is used as a condition to open the necessary application.
In our case we add:
- /application1/
- /application2/
As you can see above, each of applications is opened with one port and within different paths.
This configuration is also useful for providing descriptive links for your applications as it is much more convenient for your users to get the information about the page content from the URL itself.
Static Content Processing
Distributing the activities between both Tomcat and Apache will increase the rapidity of your application. It is available with Apache mod_proxy module:

As you can see in the scheme above, Tomcat will serve the application itself while Apache will work with delivering of the static content. Come through the following steps to make your application serve more users simultaneously:
1. Let’s imagine that you have two environments listed: first one with Tomcat server and your application hosted and the second one with Apache server used for serving the static content.
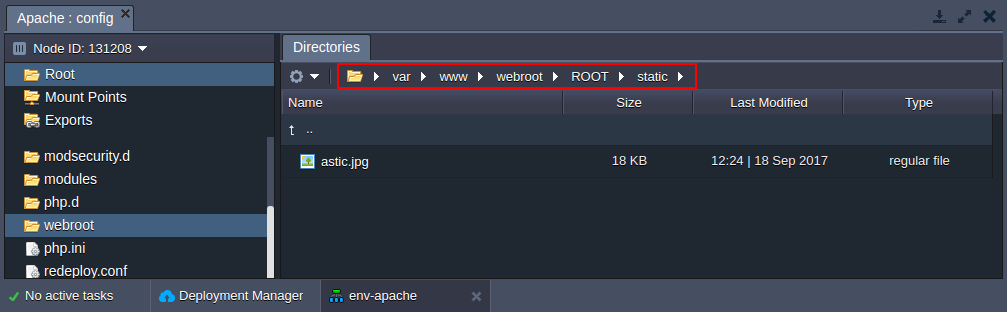
2. Press Config button next to your Apache application server and navigate to the var/www/webroot/ROOT folder. Create a special folder for your static content (named, for example, static) and upload the necessary files there.
3. Then open the /etc/httpd/conf/httpd.conf file.
Perform the necessary configurations in the < VirtualHost > block as it is described below:
| |
The ProxyPass /static ! line means we don’t proxy requests started with /stat keyword.
All other requests will be proxied to the Tomcat server with your app hosted within path specified in ProxyPass and ProxyPassReverse lines.
4. Restart your Apache server.
5. Press Open in Browser next to the Apache environment to check the result. If everything was done correctly, you will see that your app proxied from Tomcat.
6. Your static content folder is also available - just specify the path to it in the URL.
Thus both Tomcat apps and static files in Apache are accessible within single port.
Load Balancing
You can add multiple Tomcat instances in order to make your environment handle more load and get some failover capabilities. In this case frontend Apache server will serve as a load distributor between all Tomcat servers.

Using the following steps you can configure your Apache server for balancing of load in your Java application within mod_rewrite module.
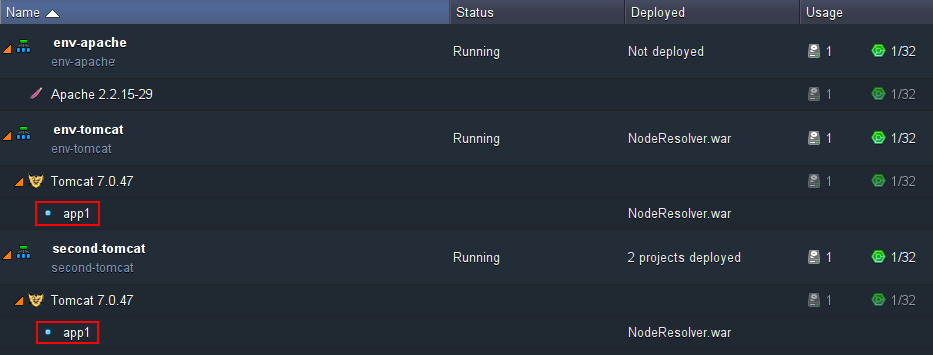
1. We will use three apart environments: two backend Tomcat environments with your Java applications deployed (note that using the similar context for both applications deployed in both environments is an obligatory requirement) and one frontend Apache environment.
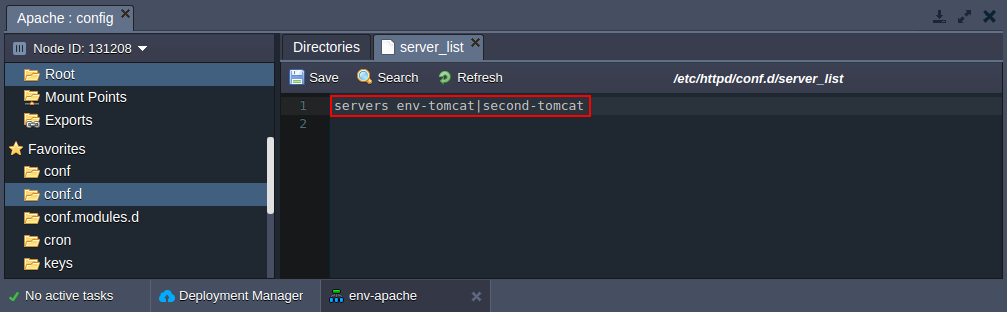
2. Press Config button next to your Apache node and navigate to the /etc/httpd/conf.d folder in the opened configuration manager. Create new server_list file there.
3. Add the hosts of your applications deployed to this newly created file like it is shown below:
servers {env1_name}.{hoster_domain}|{env2_name}.{hoster_domain}
4. Then open the /etc/httpd/conf/httpd.conf file and specify the following configurations:
| |
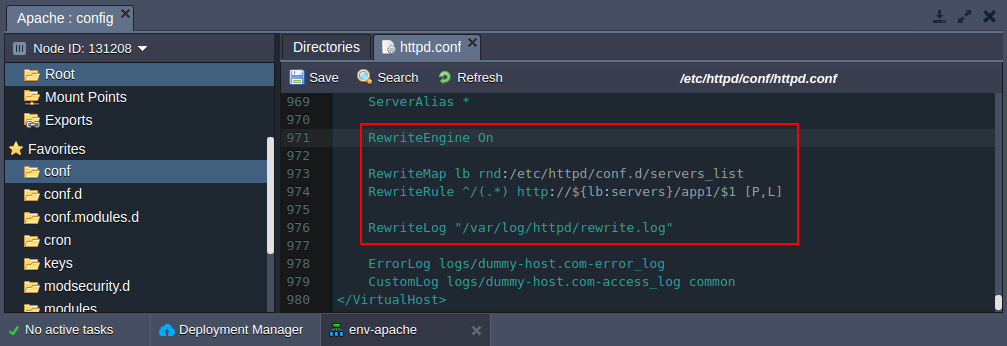
- RewriteEngine On is used for enabling the rewriting ability
- RewriteMap sets the path to the hosts, stated in the server_list file, created before.
- RewriteRule sets the load balancing terms
- RewriteLog is optionally added to store the logs of rewriting in the specified location
5. Press Restart button for your Apache node.
6. Click Open in Browser icon next to the Apache application in order to see the results. One of the Tomcat applications will be opened. Refresh the page (maybe you need to do this several times) to see the second app opened - it is the result of load distribution.
Enjoy the benefits of Tomcat and Apache interconnection by making your application even more high-performing, flexible and stable.